Taking Softwood & Semi-ripe Cuttings : A Quick Guide
Although taking cuttings is more usually associated with spring time, early autumn is a good time to take cuttings of tender plants that you want to overwinter, such as pelargoniums or geraniums, to improve your chances of getting more plants through the winter intact. This quick how-to guide will help you succeed with cuttings.
Softwood cuttings are those taken from the tips of plants, where the stems are green and not at all woody. These are suitable for pelargoniums, geraniums and the like. Semi-ripe cuttings are those using slightly harder wood, for example from lavenders, rosemary and similar. The process is pretty much the same for both.

- Prepare some compost for the cuttings. You don’t need any specialist compost, as basic multi-purpose compost mixed with some perlite is a good option. However, if you don’t have any, you can even use ordinary garden topsoil.
- Choose a suitable pot. You want one that is wide and shallow, so that you can fit four or five cuttings around the top of the pot.
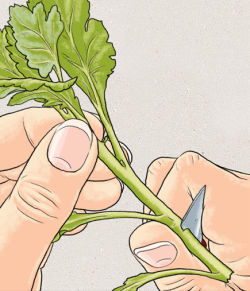
- Using a sharp knife, cut several shoots off the plant, giving yourself two or three inches of stem. Cut just above a leaf node (the point at which two leaves meet the stem together).
- Prepare the cutting. Again using a sharp knife, cut off most of the lower leaves, leaving just two to four at the top of the shoot. At this point, many people swear by dipping the cut end of the shoot into hormone rooting powder, but the official view is that this probably isn’t necessary for plants like geraniums that grow and root vigorously anyway.
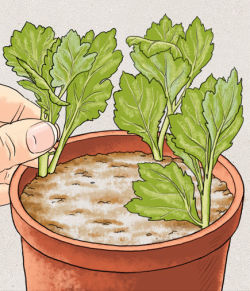
- Using a dibber, or pencil if you don’t have one, make holes in the compost around the edge of the pot and drop your cuttings into them, spacing them evenly around the pot and gently firming them in. A pot of about three inches in diameter can fit four to five cuttings.
- Place the pot in a tray of water, to allow it to soak up water without the crown of the cuttings getting wet.
- Put the pot into a propagator. If you don’t have one, place a large, clear plastic bag over the pot, and secure the base. This will prevent the cuttings from losing too much moisture until the roots have grown. Keep your pots in a shady greenhouse, or on a north-facing windowsill, out of direct sunlight.
- After about four to six weeks, your little plants should have rooted, and will be ready for potting on into individual pots, to keep somewhere cool but frost-free over winter.
Come the spring, you should have a stock of little plants waiting for you!